Serving up veggies in all of our products!

Showing posts with label crafts with kids. Show all posts

Thursday, November 15, 2012

Fall Time DIY


Who doesn't love to get mail... well unless it's bills or political propaganda from these past few months.

Our fall time craft is a homemade mailbox to post outside your child's bedroom door. It's a great way to make your child feel extra special and loved.

Use a small brown paper bag and have your child decorate the outside. Why not collect fall time leaves, acorns and twigs to glue on the outside of the bag and then tape it up outside his/her bedroom door.

From there it's up to you and your family to leave special notes!

Monday, November 5, 2012

Personalize It

We found this today and wanted to pass it on. What an easy way to personalize your child's coat, shirt, or any article of clothing. Either add a button to their clothing or re-sew an existing one.


Friday, January 27, 2012

Cat's Cradle

We recently had an office showdown of Cat's Cradle and got stuck on this strange string configuration:


I remember seeing this pattern when I used to play Cat's Cradle as a kid... I just couldn't remember what to do with it. So I turned to You Tube and found dozens of tutorials to teach me the correct way to play. Turns out... I was doing it wrong all along ;)

Here is one of our favorite tutorials on playing Cat's Cradles. Learn from the pro's:

Friday, June 3, 2011

What We're Into Right Now

We love crafts that repurpose things we might otherwise recycle or trash, so after reading this post on makeandtakes, we've been collecting pieces of ribbon and paper for a kid-friendly craft: scrap gift bows! 
Check out this post from http://www.makeandtakes.com !


"Supplies for Easy Scrap Gift Bows:
  • scraps of patterned paper
  • newspaper or used wrapping paper
  • tulle
  • ribbon
  • ric rac
  • string
  • buttons
  • flowers


Scrunch paper(s) in the middle so it resembles a bow. Sometimes I like to fold my paper like a fan for added dimension. Layer scrunched “bows” of different sizes. Tie them in the middle with a piece of ribbon.


Layer a few more pieces of ribbon in the middle of the bow and tie on with same ribbon. 

Wrap a long piece of ribbon or tulle around the gift. Lay your bow in the middle and tie ends of long ribbon around to secure. Finish with a bow, or secure a flower or button in the center. Voila!"

We've got a box of scraps going. How about you? Do you have a project in the making?

Info from:
http://www.makeandtakes.com

Friday, April 29, 2011

Wearable Art Project


Entertain your child's creative side with this easy wearable art project!
Materials needed:
  • plain white T-shirt (new or on-it's-way-out)
  • age-appropriate needle
  • spools of colored thread
For any child old enough to use a needle and thread, set them up with a plain white T-shirt (new or on-it's-way-out), an age-appropriate needle, and a bunch of colorful spools of thread. Let them go at it however they like, creating an impressionistic piece of wearable art. 

Do they start working on one of the tee's shoulders and stay there? Do they start smack in the middle, dart all over the place and back again? You will even want your own version of their signature creation! 

We'd love to see what your child does with this kind of artistic freedom. Please post their wearable art (preferably with them in it) to our facebook wall and we will send you a coupon redeemable for our products!


Words of caution:
How soon you can begin teaching a child to sew depends on the age, maturity, and patience of the child. Be sure to only teach techniques you’re already comfortable doing yourself. If you don’t know how to sew, learn the skills you need first, then teach the child. Always supervise the use of needles, pins and scissors.


Sources:
 * How to Teach a Child to Sew: eHow.com

Wednesday, October 20, 2010

Make Your Own Fry Carton!

When we first introduced Veggie Wedgies at an industry tradeshow, we served samples in mini fry cartons. The cute little cartons made the whole experience so much fun for everyone at the show and will do the same for you and your kids at home.

Here's how to make your own fry carton:


  1. Print the fry carton: Click on the image and it will take you to a new tab/window. If on a Mac, hold the "control" key and click on the image. If using a PC, right click on the image. Select "copy image." In Microsoft Word, go to "edit" "paste special" and select "image." 
  2. Cut out the fry carton.
  3. Score the dashed lines with the back of an exacto knife.
  4. Fold along the solid gray lines.
  5. Put glue on the dotted sections. Bring the inside of the back flap to meet the folded gluey sections and press to secure. 
  6. Holding the carton upright (open side pointing up), press the bottom of the carton upward and the carton will pop open, ready to hold some warm, crispy, baked veggie fries!

Thursday, June 3, 2010

Fruit Remix on the Original Candy Necklace

We love all things edible here at Peas HQ! This is a fun crafty project you can do with your kids on a rainy afternoon or whenever their friends come over. Here is our healthy version of those edible Sweet Tart necklaces & bracelets. Instead of those sugar rounds why not string snacks you would rather your kids eat?!

Supplies:
* elastic craft string
* plastic craft needle
* stringable foods:
  • cheerios
  • dried fruits like
    • mangoes, cut into 1/2 inch peices
    • apples, cut into 1/2 inch pieces
    • raisins
    • cherries
  • licorice, cut into 1/2 inch pieces
  • mini marshmallows
  • popcorn

For the younger kids you may want to make bracelets instead of necklaces for safety reasons.
Start with about an 8 inch length of elastic craft string for a bracelet and 14 inches for a necklace.

Thread one item on the string and double-knot the string to it.

Let your children continue threading the ingredients you have gathered onto the string.

When they've filled it, knot the ends together. Now they have a necklace to wear and a snack to nibble!


For more kids' food crafts, check out this site.

Thursday, April 22, 2010

Celebrate Earth Day: Make A Birdfeeder from Recyclables


Inspire the whole family to become more concerned about protecting the environment by making a bird feeder from a quart-sized milk or juice carton. Everyone will enjoy watching wildlife up-close right at home. You might want to encourage the kids to keep a diary of the birds that take visit your feeder.

This design protects the bird seed from rain and snow, which is very useful in the winter months when many bird feed platforms become snow covered and unusable.


Materials:
  • milk or juice carton
  • craft knife or scissors
  • wax pencil or crayon
  • ruler or straight edge
  • two small lengths of double-sided tape
  • two bamboo skewers or straight, small diameter twigs to use as perchs
  • bird seed
  • hole punch
  • heavy twine to make a hanger

  • Directions
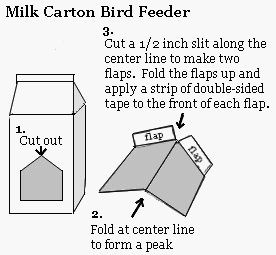
    1. Use the wax pencil and ruler to draw the shape of the opening on the front of the milk carton, as shown in the diagram at right. The opening looks like the outline of a house with a peaked roof. You should allow about two inches at the bottom of the carton to hold a good amount of seeds.

    2. Use the craft knife to cut out the opening. Younger children will need an adult to help with this part.

    3. Using the top of the peak as a center point, fold the piece of milk carton that you just removed in half along its length. Make a half inch cut from the point of the peak down the center fold. Fold up a half inch flap on either side of this cut, as shown in the diagram at right.

    4. Attach a length of double-sided tape to each flap.

    5. Insert this roof piece into the top of the opening and use your fingers to press the flaps against the inside of the milk carton until the double-sided tape holds securely.

    6. Poke a bamboo skewer or thin straight twig through the wall of the milk carton, just below the left side of the opening. Repeat on the right side. Poke skewers all the way through and out the back wall of the carton. This keeps the perches straight and secure.

    7. Use a hole punch or a skewer to punch two holes through the top line of the carton.

    8. Thread twine through the two holes to make a hanger. 9. Fill the bottom of the feeder with nyger seed or a small bird seed mixture. Hang your milk carton bird feeder from a tree branch that you can reach easily when you need to add more bird seed.


    Source: